Crickets…

Just in case you are wondering: This project is not dead. For a number of reasons we’ve had to put it on hold for a while, but hopefully, we’ll be able to get a few things done in January. There will be another break in spring, though, so it will be a while before things get back to normal.

I guess I should have put this up months ago, but I just didn’t think of it…

Depth Setting Jig for Fret Slotting Saw

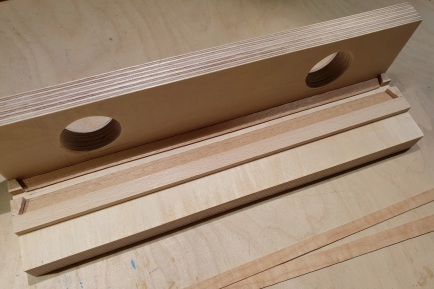
Now I have this marvellous depth stop thing, but how do I actually set the depth correctly to any value I need, i.e. how do I make sure both blade guides are exactly in parallel and at the right depth? Well, I made another jig out of plywood and little pieces of veneer of known thickness:

Using it is rather simple. First, make sure the nuts are not tightened yet, so everything can move freely. Select two identical strips of veneer of the desired thickness (or, if you want to go deeper than the thickest veneer you have, use more than one layer) and Continue reading “Depth Setting Jig for Fret Slotting Saw”

Depth Stop for the Fret Slotting Saw

When you make guitars you need to make guitar necks. Guitar necks need fingerboards, and unless you build a fretless instrument, you need to cut slots for the frets into the fingerboard. The most common tool is a fret slotting saw (I guess most hobby luthiers don’t have access to a CNC machine, and using a Dremel with a very fine routing bit might be a bit tricky, if you even own such a device).

Those slots must be deep enough to accommodate the tangs of the fret wire so that the crown of the frets actually rest on the surface of the fingerboard but the tangs don’t touch the bottom of the slot by a hair’s width. On the other hand,e the slots shouldn’t go too deep because you don’t want your fretboard to be wobbly. Stability and stiffness is what you want. So making sure you don’t cut too deep is kind of important. But how do you do that?

You use a jig that limits how deep you can cut, and if you don’t have one and don’t want to buy one, you Continue reading “Depth Stop for the Fret Slotting Saw”

Learning by Doing

I am not a luthier, I have no ‘official’ training in luthiery or any other sort of woodworking. My day job is at a desk with a computer. What woodworking experience I have I gained from watching others and then trying things out on my own. I try to understand processes, the mechanical side of any tool I use and of any processing step I attempt.

My as yet somewhat limited luthiery know-how comes from watching people build guitars on YouTube. I read a book about building guitars, too: Martin Koch’s Building Electric Guitars (ISBN 978-3901314070), which has been quite useful in a number of ways and does me good service as a work of reference.

The rest is basically trial and error, aka learning by doing. I Continue reading “Learning by Doing”

Building the Body

We have started working on the body. First we kicked some ideas around regarding the shape of our instrument. In the end, I drew the outline on tracing paper, made a routing template, traced the outline onto the body blank.

Then I used the jigsaw to cut along the line (actually, a few millimeters outside the line to give me a bit of a safety margin). Fixed the template to the rough cout body – as always using the Masking-Tape-and-Superglue trick – and used the router to Continue reading “Building the Body”

Making a Routing Template for the Body

The body of an electric guitar is usually made of a thick slab of hardwood. The luthier roughly cuts the intended contours of the body out of this slab, always leaving a safety margin of a few millimetres. The most common tool for cutting the body is the band saw. Other people such as myself don’t own a band saw and make do with a jig saw which works just as well.

From this raw body you work your way towards the final form by removing all material that is outside the planned surface of the guitar. There is a number of tools you can use for this such as chisels, rasps, a spindle sander, but depending on which tool you use it would take ages and be somewhat frustrating, or you would risk overshooting and removing more than you intend. Cutting away stuff is easier than putting it back. To avoid this sort of problem it is easiest to Continue reading “Making a Routing Template for the Body”

Preparing for the Build

Once the decision was made, I started to think about eqipment. I do have some woodworking experience, and over the years I have accumulated quite a few tools – a hammer, pliers, rasps, files, chisels, saws, a drill-press, drill bits, a belt grinder, a jig-saw, clamps, a vice. The year before last I had even built a, well, a sturdy working table, the next best thing to a proper workbench, and found a spot for a little workshop in the cellar.

So I didn’t come completely unequipped, but it was obvious that we would need quite a few additional tools. Basically everything necessary for fretwork. So I started looking for stuff, found Crimson’s Luthiers Starter Toolkit, ordered that and a few extra bits and pieces from Crimson. Bought a fret slotting saw here in Germany, some scrapers, a saw rasp, a router from my local DIY store.

I tried to buy as little as possible because, let’s be honest, this stuff is bloody expensive. And if you have things shipped from the UK to Germany, shipping is daylight robbery these days (around 50 Euros, no fault of Crimson’s, of course, they don’t make the freight rates), and then, adding insult to injury, there will be customs fees on top of that (another 80 Euros thanks to Brexit). Spending so much money on something that might turn out to be a cul-de-sac for me felt weird. I guess if it works well, I’ll come back and spend some more money on tools and stuff, a reasonable No 6 plane for example.

Then we talked about the design of the guitar, and ideas began to form. This being a first build with a certain level of trepidation as to what the result will be, I didn’t want to Continue reading “Preparing for the Build”

The Idea

How did it all begin? Well, some time in late 2019 I stumbled upon a Youtube video of someone building a guitar. I don’t remember which video, but most likely it was something by Burls Art, at least his were some of ‘my’ first luthiery videos. Then there was this piece of art about Montreal based luthier Michael Greenwood building an acoustic steel-string guitar.

Anyway, I liked what I saw, went on looking for more guitar building videos, and before long I came across Ben Crowe’s videos just before the Great Guitar Build-Off 2020 started. By then I was hooked on luthiery.

I began to think about building a guitar myself, but was wasn’t sure whether I would be able to Continue reading “The Idea”

Kick-off

Ok, now this is Sawdust Glue and Wire, my guitar building blog. I don’t know yet how the guitar project will go, whether I’ll end up with a playable instrument or a pile of scrap metal and fancy kindling. Or how the blogging will come along.

I don’t have this all planned out to the last detail, and in particular the blogging doesn’t follow much of a plan. I guess my daughter will contribute the odd piece of text, but that is up to her. Wait and see…

P.S.: WordPress puts “sponsored posts” into blogs on wordpress.com. They are a nuisance, but I can’t help it, so all we can do is grin and bear it.